Running a Realtime Experiment
Running the ProjectInterface
The projectInterface is typically run on a VM in the cloud (i.e. a ‘remote’ computer) which does not have direct access to the DICOM images. The advantage of a cloud VM is that any laptop browser can connect to it and no additional hardware or software installation is needed on the control room computer. However the projectInterface can also be run on a ‘local’ computer, meaning on the same computer in the control room where the DICOM images are written.
Running ProjectInterface in the Cloud
1) Start the projectInterface
From the cloud VM computer run the following command. See Definitions Section for description of the parameters.
cd rtcloud/
conda activate rtcloud
bash scripts/run-projectInterface.sh -p [your_project_name] -c [config_file] -ip [local_ip_addr] --dataRemote --subjectRemote
Example:
bash scripts/run-projectInterface.sh -p sample -c projects/sample/conf/sample.toml -ip 125.130.21.34 --dataRemote --subjectRemote
The -p option is used to locate your project in the /rt-cloud/projects/ directory, the name specified should match your project directory name.
The -c option points to your project configuration file in toml format.
The -ip option is to update the ssl certificate with the ip address where the projectInterface runs. Use ‘hostname -i’ or Google ‘what’s my ip address’ to get the ip address of that computer.
2) Start the scannerDataService
The scannerDataService is started on the control room computer where the DICOM images are written by the scanner. It can forward those images to the projectInterface when requested by your project code. The [username] and [password] are the login credentials to the projectInterface because the scannerDataService must connect to the projectInterface to be able to serve files to it.
bash scripts/run-scannerDataService.sh -s [projectInterface_addr:port] -d [allowed_dirs] -f [allowed_file_extensions] -u [username] -p [password]
Example:
bash scripts/run-scannerDataService.sh -s 125.130.21.34:8888 -d /tmp,/data/img -f .dcm,.txt
3) Start the SubjectService
The subjectService is started on the presentation computer where PsychoPy or similar software will run to provide feedback to the subject in the MRI scanner. The [username] and [password] are the login credentials to the projectInterface because the subjectService must connect to the projectInterface to be able to receive classification results.
bash scripts/run-subjectService.sh -s [projectInterface_addr:port] -u [username] -p [password]
Example (run from the rt-cloud directory):
bash scripts/run-subjectService.sh -s 125.130.21.34:8888 -u user1 -p passwd1
Running ProjectInterface Locally
The projectInterface can also be run on the control room computer where the DICOM images are written. This is called running it ‘locally’. When run locally the fileServer (scannerDataService) is not needed because the projectInterface can directly read the DICOM images from disk.
1) Start the projectInterface: same command as above but without the –dataRemote or –subjectRemote options
bash scripts/run-projectInterface.sh -p [your_project_name] -c [config_file] -ip [local_ip_addr]
Example:
bash scripts/run-projectInterface.sh -p sample -c projects/sample/conf/sample.toml -ip 125.130.21.34
Connecting with the Browser
SSL Certificate Installation
The connection between your web browser and the projectInterface is encrypted using SSL for security. In order for your browser to trust the connection to the projectInterface, the SSL certificate created during the projectInterface installation process must be added to a list of trusted certificates on your browser computer.
Copy the ssl certificate rtcloud/certs/rtcloud.crt to your computer running the web browser.
Install the SSL Certificate in your Web Browser
On Mac:
Open application ‘Keychain Access’.
Click on ‘Certificates’ in bottom left pane
Select File->Import Items… and select the ssl certificate downloaded to your computer
In ‘Certificates’ pane, double-click the ‘rtcloud.princeton.edu’ certificate
Select the ‘Trust’ drop-down item.
In ‘When using the certificate’ selector choose ‘Always Trust’
On Linux:
Navigate to the projectInterface web URL, e.g. https://localhost:8888
You will see a security warning about untrusted certificate
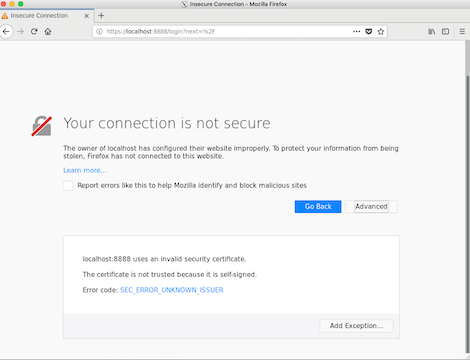
Click ‘Add Exception’
You will see a dialog box
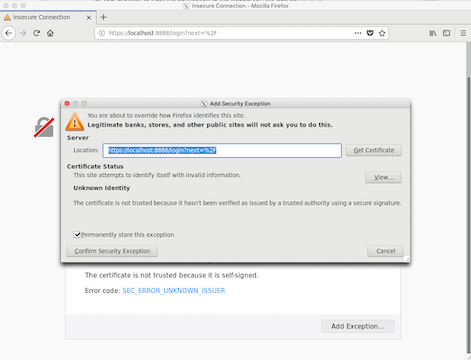
Click ‘Confirm Security Exception’
Open Web Page in Browser
Open a browser and navigate to https://<projectInterface_addr>:8888
On the login screen enter the [username] and [password] that were created during installation by the adduser.sh script
Notes on Security
There are several security mechanisms
Encryption - Using SSL connections means all data is encrypted in transit.
Password - A username and password mean that only authorized users can connect to the projectInterface.
Restricted directories - The fileserver restricts which directories it will return files from.
Restricted file types - The fileserver restricts which file types (denoted by the file extension, e.g. .dcm) it will return.
Direction of connection - The fileserver doesn’t allow connections to it. The fileserver always initiates the connection going to the projectInterface.
Using VNC Server to view an application’s display on the server
Sometimes it is necessary to see the GUI (graphical window) output of a program running on the projectServer computer. For example, during session initialization a researcher may want to run FSLview to see if the image registration looks correct. This can be done by running a VNC Server on the computer where the projectServer is running. The VNC Server starts a second virtual display (:1) and any application can then render to that display. The web interface has a tab called ‘VNC Viewer’ which can view and interact with the content on that display. Note: the VNC Server uses a program called websockify which can wrap any TCP/IP program so that it can be accessed from a websocket client, websockify wraps VNC Server for this purpose.
Install VNC Server on the projectServer Computer
Install the websockify conda environment:
conda env create -f websockify.yml
Install VNC on the server:
 sudo yum -y install tigervnc-server
 sudo yum -y install xclock
 sudo yum -y install xdotool

 cat <<EOT >> ~/.vnc/xstartup
 unset SESSION_MANAGER
 unset DBUS_SESSION_BUS_ADDRESS
 #exec /etc/X11/xinit/xinitrc
 xsetroot -solid grey -cursor_name left_ptr
 xeyes
 EOT
Start the VNC Server running with websockify to serve connection requests:
bash scripts/run-vnc.sh
Applications started on the projectServer, such as from the session initialization script, can redirect their output to the VNC display by prepending “DISPLAY=:1” to the command. For example:
DISPLAY=:1 xclockThe VNC display can be viewed from the VNC Viewer tab of the web interface. Click ‘reconnect’ if needed to re-initialize the VNC connection.
Definitions
[allowed_dirs] - This allows restricting which directories the fileServer is allowed to return files from. Specify as a comma separated list with no spaces, e.g. ‘-d /tmp,/data,/home/username’
[allowed_file_extensions] - This allows restricting which file types the fileServer is allowed to return. Specify as a comma separated list with no spaces, e.g. ‘-f .dcm,.txt,.mat’
[config_file] - the location of project specific configurations in a toml file format. This will typically be located in a directory within the project such as rtcloud/projects/your_project/conf/. E.g. the sample project config file is rtcloud/projects/sample/conf/sample.toml
[local_ip_addr] - network address of the computer where a command is issued
Get the local ip address
Mac: Google “what’s my ip address”
Linux:
hostname -i
[username] [password] - The username and password to login to the projectInterface. This was created with the adduser.sh script during installation of the projectInterface.
[projectInterface_addr:port] - The network address and port number that the projectInterface is listening on. The default port is 8888. E.g. ‘-s 125.130.21.34:8888’
[your_project_name] - The name of the subdirectory under the rtcloud/projects/ directory which contains your project specific code. Your script should use the same name as the directory, i.e. sample.py, so that the projectInterface can find it.
[run] - An fMRI scanner acquisition block of images. For example running the scanner to collect a block of 200 scans with a TR image repetition time of 2 seconds; this run will take 400 seconds and generate 200 DICOM images.
[scan] - The file sequence number corresponding to a run. For example, in the image name ‘001_000014_000005.dcm’, the scan number is 14 and the image volume number (TR id) is 5.