Overview
Realtime fMRI Cloud Framework
The Realtime fMRI Cloud Framework is an open-source software package that makes it easier to build and deploy real-time fMRI experiments. RT-Cloud streams scanner data (DICOM images) over to the cloud (or any machine) for real-time analysis, which then can be forwarded to the machine presenting stimuli to the participant, allowing for real-time control over experiment presentation (e.g., depicting trial-by-trial neurofeedback to the subject via PsychoPy, jsPsych, MATLAB PsychToolbox, etc.). RT-Cloud supports neuroimaging standards such as BIDS and OpenNeuro.org.
RT-Cloud supports any sort of machine configuration. You could run RT-Cloud entirely on a local computer or you can have separate machines handling each of the below three components.
For more information on RT-Cloud, see our paper in NeuroImage 2022. If you publish work that utilized RT-Cloud, please include a citation to this paper.
Overview of RT-Cloud Components
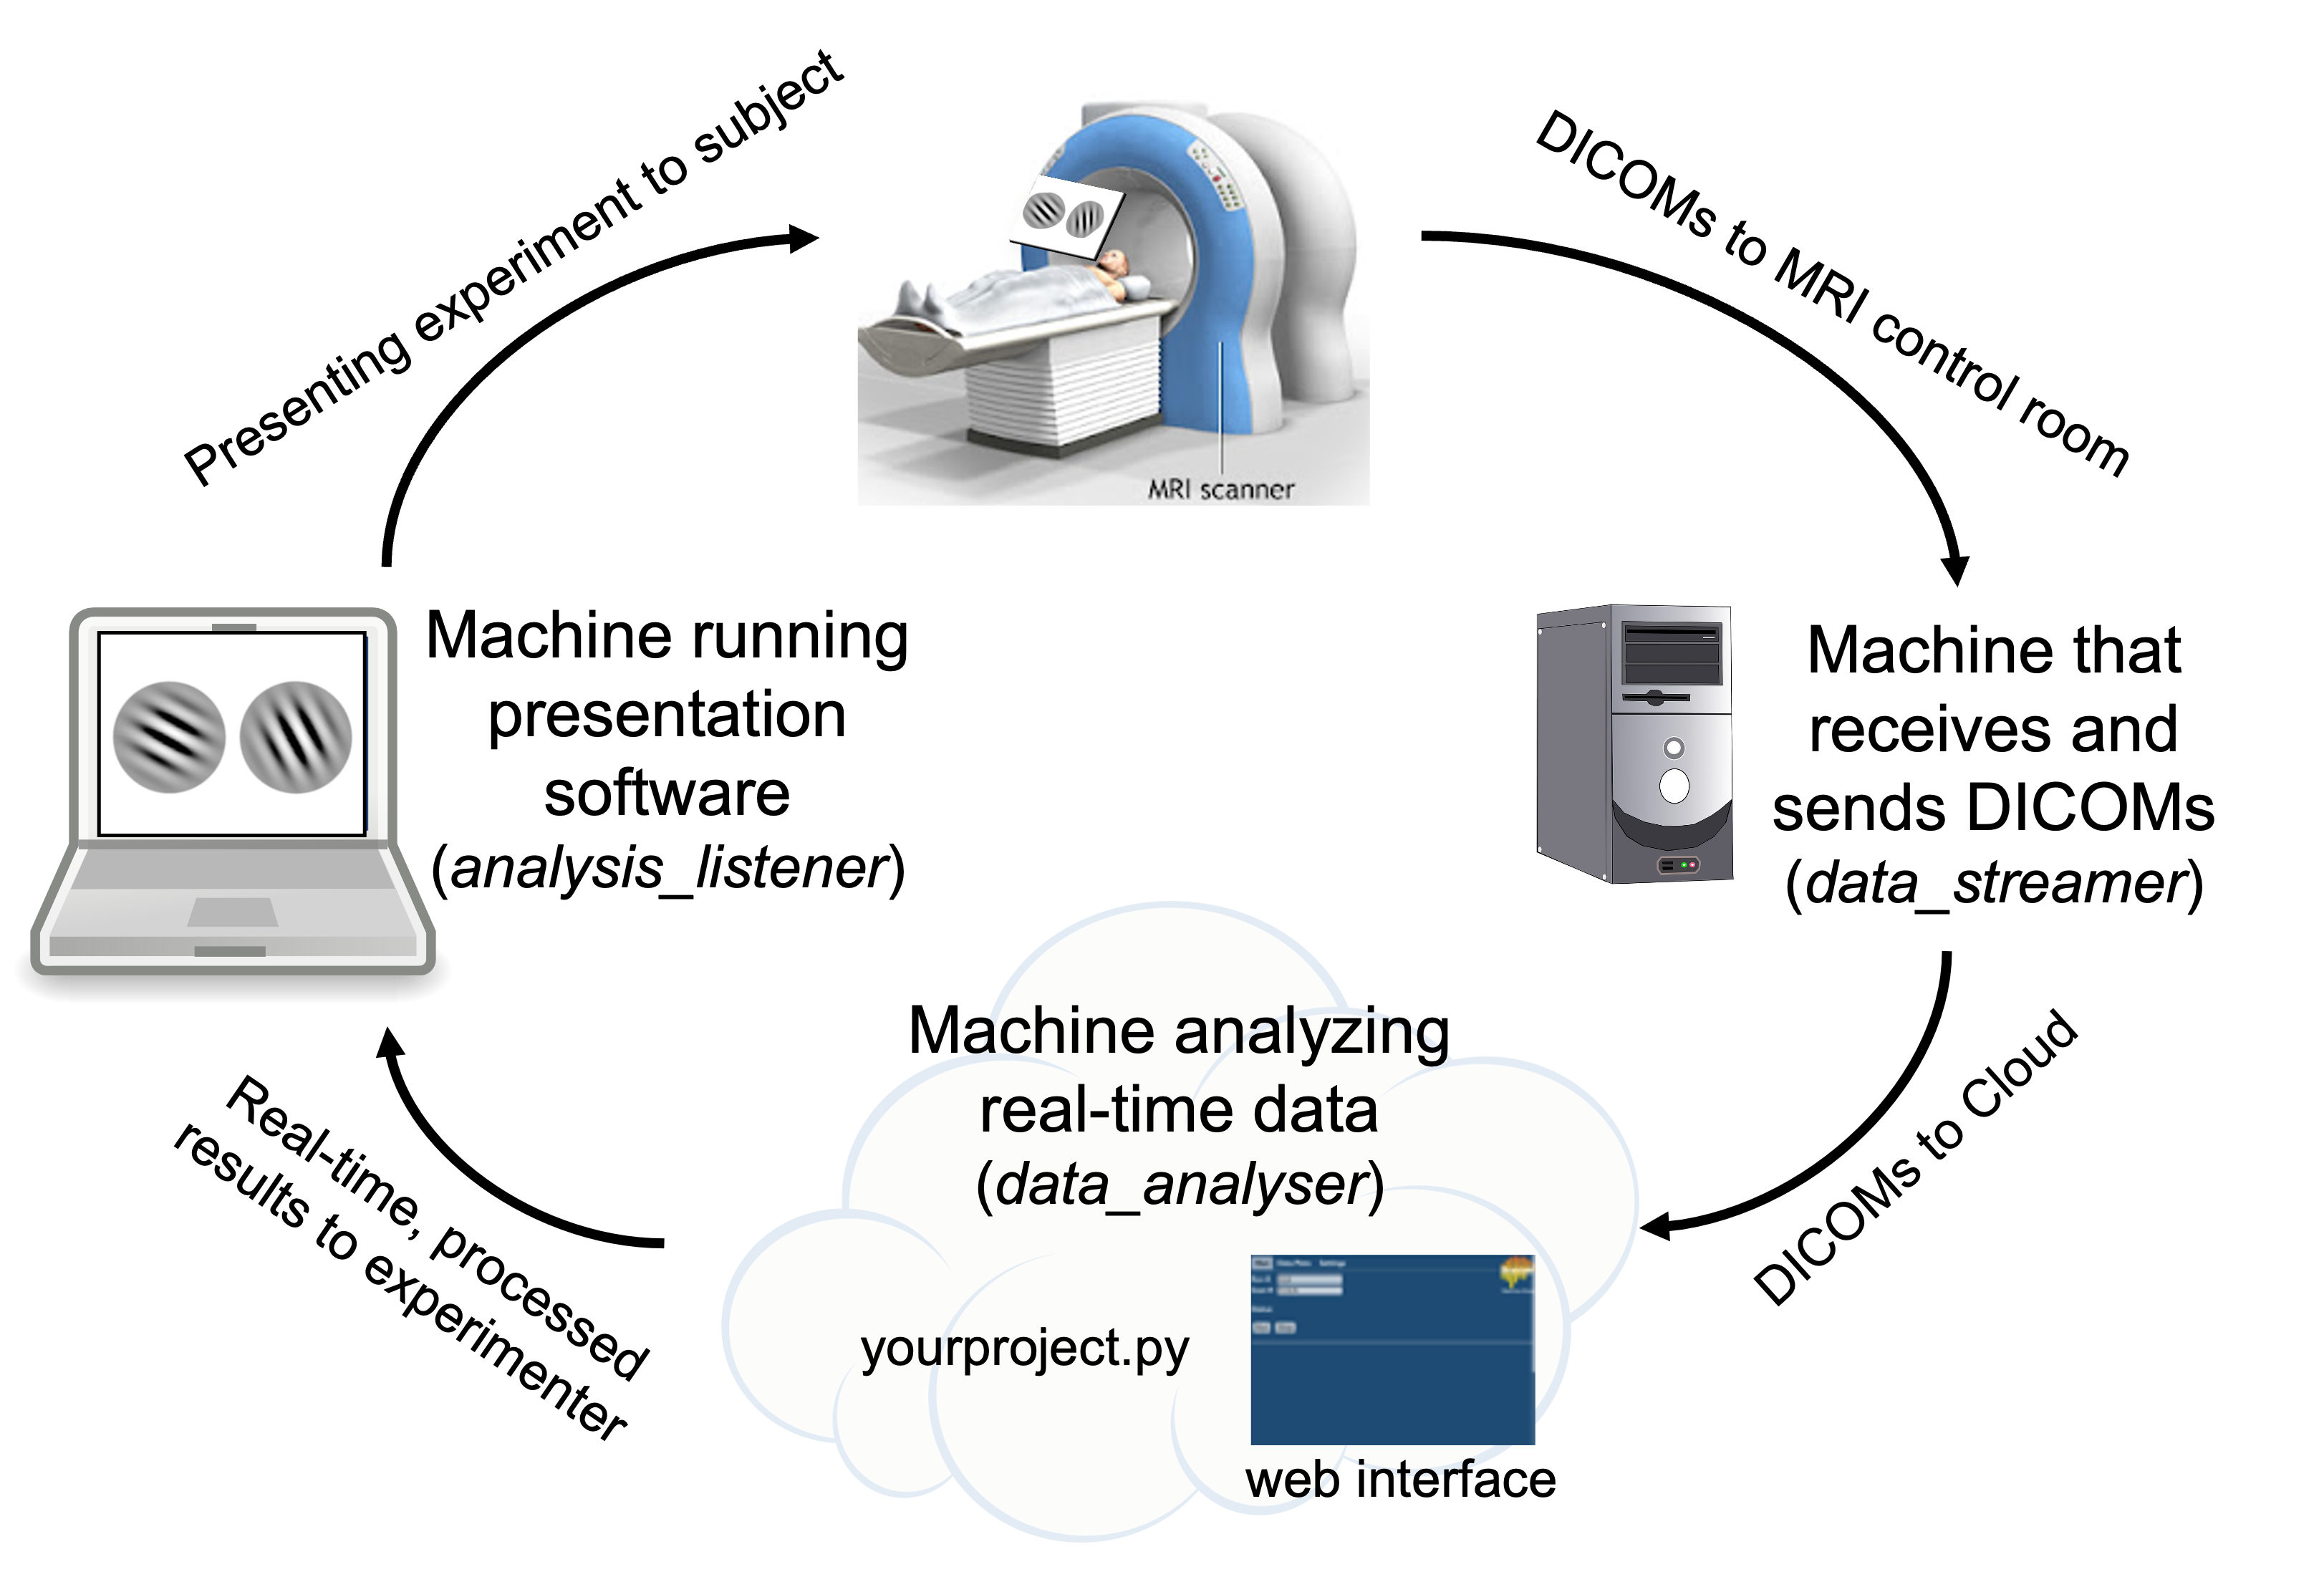
data_streamer (runs on machine that recieves/sends DICOMs)
Watches for new DICOM brain images and sends them to whatever machine is analysing the data
Can simulate the transfer of DICOMs from the MRI scanner using a precollected folder of DICOMs or via an OpenNeuro dataset (OpenNeuroService)
data_analyser (runs on machine that analyses data in real-time)
Runs experimenter’s script to process DICOMs
Provides a web-based user interface for experimenter control
analysis_listener (runs on machine that runs presentation software)
Listens for results from data_analyser to inform experiment presentation (e.g., PsychoPy, jsPsych, MATLAB PsychToolbox)
As an example for how you could setup the RT-Cloud components across machines, you could have the MRI workstation running data_streamer, a cloud-based virtual machine running data_analyser, and the experimenter’s laptop presenting stimuli based on the results from analysis_listener.
Development of RT-Cloud was initially funded by Intel Labs; the framework is under active development with funding from NIMH to further extend its capabilities.
Quickstart Demo: sample project via Docker
Assuming that Docker is installed (if not, see instructions below) you can follow these instructions to automatically run a sample project that demonstrates some of RT-Cloud’s functionality. The three aforementioned components will be run on a single machine without SSL encryption. Ten DICOM files will be analyzed in real-time and the average brain activation for each TR will be plotted in the RT-Cloud web browser’s “Data Plots” tab.
Docker
docker run -it --rm -p 8888:8888 brainiak/rtcloud:latest scripts/data_analyser.sh -p sample --test
Wait for the terminal to output “Listening on: http://localhost:8888” and then open your web browser and go to the url “localhost:8888” (if using a cloud machine, replace “localhost” to the cloud server’s ip address). The login username/password for the web browser are both “test”. Click the “Run” button to run through the simulated real-time scanning example.
RTCloud Installation & Usage
1. Install Docker, Singularity, or Miniconda
You can use either Docker, Singularity (under construction), or a local Conda environment to run RTCloud.
Docker Installation
Windows: https://docs.docker.com/desktop/windows/install/
Note that Windows has a quirk when it comes to volume mounting with Docker. Docker commands along the lines of “-v $PROJ_DIR” require a backslash “/” before the directory (e.g., “-v /$PROJ_DIR”). Volume mounting also requires full paths: e.g., “-v ~/certs” would need to be replaced with the full path “-v /c/Users/paul/certs”.
If using Git Bash, you will need to add “winpty” before all Docker commands.
Mac: https://docs.docker.com/desktop/mac/install/
M1 Macs are not supported! All RTCloud functionality will work but scripts will run very slowly. You should follow the local installation instructions instead.
Linux: https://docs.docker.com/engine/install/
Pull RTCloud Docker image
Either pull rtcloud (9Gb, recommended), rtcloudxl (30Gb), or rtcloudlite (3.6Gb)
docker pull brainiak/rtcloud:latest
“rtcloud”: RTCloud, FSL analysis functions (no fsleyes), most of ANTs, c3d_affine_tool, brainiak, VNC Viewer
“rtcloudxl”: RTCloud, FSL, fsleyes, ANTs, Convert3D, brainiak, VNC Viewer
“rtcloudlite”: RTCloud, brainiak, VNC Viewer
Docker images operate in Linux CentOS and use a miniconda environment called “rtcloud” that contains many preinstalled packages (see environment.yml, environment-synthetic-data.yml, websockify.yml, docker/Dockerfile.rttools).
Local Installation
(Note: Windows not supported.)
Install miniconda
If not installed, follow these steps to install miniconda: https://docs.conda.io/en/latest/miniconda.html
Clone rt-cloud code from github and cd into it
git clone https://github.com/brainiak/rt-cloud.gitcd rt-cloud/
Prepare rtcloud conda environment
conda create –name rtcloudNote: you must use the name “rtcloud” for your conda environment!
conda activate rtcloud
Install necessary packages
conda install -y -c defaults -c conda-forge awscli bcrypt boto3 dcm2niix flake8 indexed_gzip jupyter mypy nibabel nilearn nodejs pip pydicom python=3.7 requests rpyc scipy toml tornado websocket-client wsaccelpip install inotify pybids watchdog
Install node module dependencies
cd web; npm install; cd ..
Install FSL, ANTs, or any other software that you plan to use for real-time analysis
2. Making RTCloud secure with SSL encryption
If you do not care about SSL encryption and simply want to test out RTCloud without security, you can skip this step (you will need to add the “–test” flag to all commands in step 4). The RT-Cloud web interface will use “https” with SSL encryption and “http” without SSL encryption.
2a. Create SSL certificate and username/password
The following instructions will create a “certs” folder on your machine. Do this step only once on one machine. To allow for encrypted communication across RTCloud components, the path to this certs folder needs to be provided every time you run RTCloud components. Replace “username” in the below code with the username you want to use to login to the RTCloud web interface.
Docker
The below code will create a certs folder located in your home directory.
docker run -it --name ssl brainiak/rtcloud:latest bash
You will now be within the RTCloud docker image in terminal. Replace “username” below with the username you want to use to login to the RTCloud web browser.
IP=`curl https://ifconfig.co/`
conda deactivate; conda activate rtcloud
openssl genrsa -out certs/rtcloud_private.key 2048
bash scripts/make-sslcert.sh -ip $IP
bash scripts/add-user.sh -u username
You will be prompted to enter a password.
exit
docker cp ssl:/rt-cloud/certs ~/certs
docker rm -f ssl
Local
The below code will create a certs folder in your current working directory. Make sure you keep note of the path where this certs folder lives for later.
IP=`curl https://ifconfig.co/`
mkdir certs; openssl genrsa -out certs/rtcloud_private.key 2048
bash scripts/make-sslcert.sh -ip $IP
bash scripts/add-user.sh -u username
# You will be prompted to enter a password.
2b. Copy your certs folder to all other machines
If you are using RTCloud across multiple machines, you should only create a certs folder once. Then, you should copy this certs folder to the other machines. All RTCloud machines must contain identical certs/rtcloud_private.key and certs/passwd files.
2c. Install SSL certificate
Perform this step on the machine that will be used to open the RTCloud web interface via a web browser (e.g., Chrome, Safari).
On Mac:
Open application ‘Keychain Access’.
On left sidebar, click ‘Login’ under Default Keychain.
Drag and drop your ssl certificate (“~/certs/rtcloud.crt” or “rt-cloud/certs/rtcloud.crt”) into the window
Your certificate should now show up in the ‘Keychain Access’ certifications list
Double-click the certification > Trust > ‘When using this certificate’ choose ‘Always Trust’
On Linux:
When you eventually go to use the web interface, a security warning about untrusted certificate will show up. When this happens, click “Add Exception” > “Confirm Security Exception”.
On Windows:
Follow the instructions outlined on this webpage: https://learn.microsoft.com/en-us/skype-sdk/sdn/articles/installing-the-trusted-root-certificate
3. Prepare your experiment’s script
You will need to prepare a folder containing whatever analysis steps you want to be performed in real-time. We supply a pre-made projects folder that contains several examples for you to try out (https://github.com/brainiak/rtcloud-projects). We highly recommend that you first try running the template project (“rtcloud-projects/template”), which is an example analysis that runs through a complete RT-fMRI pipeline based on Mennen et al. (2021) and is heavily commented such that you can understand what the script is doing and edit it to suit your particular experiment’s needs. If you are not using the template project, then replace any instances of “template” in the code blocks below with the name of your project.
Note that the template project uses FSL and ANTs commands, which are preinstalled in the “rtcloud” and “rtcloudxl” Docker/Singularity images, but which would need to be installed if using RTCloud locally or with the “rtcloudlite” Docker image.
git clone https://github.com/brainiak/rtcloud-projects.git
4. Run RTCloud experiment: template project
The following starts up the three RTCloud components and runs through the template project mentioned in step 3. These three components can all be run on the same machine or can be separately started up on different machines.
If you are running all three components on the same machine within a single terminal for testing purposes then you can skip steps 4b and 4c, remove the –dataRemote and –subjectRemote arguments, and if using Docker add -v OUT_DIR:/rt-cloud/outDir to the data_analyser command (where OUT_DIR refers to where you want your realtime outputs stored).
If you are running all three components on the same machine with different terminal windows for testing purposes then you should only specify “-p 8888:8888” in the initial data_analyser command, and you should use “172.17.0.1” as your WEB_IP if using Docker.
4a. Run data_analyser
Docker
Replace <full_path_to_template_project_folder> with the path to your template folder (e.g., ~/rtcloud-projects/template).
PROJ_DIR=<full_path_to_template_project_folder>

docker run -it --rm -p 8888:8888 -v ~/certs:/rt-cloud/certs -v $PROJ_DIR:/rt-cloud/projects/template brainiak/rtcloud:latest scripts/data_analyser.sh -p template --dataRemote --subjectRemote
You should eventually see an output in your terminal that says “Listening on: https://localhost:8888” (or http://localhost:8888 if not using SSL encryption). Copy this address and paste it into your web browser. You may need to replace “localhost” with the IP address of the data_analyser (e.g., the public ip address of the cloud machine, or potentially Docker’s network ip “172.17.0.1”). Login using the username/password you created in step 2, or using username:test password:test if running in –test mode.
After you login, look to the top-right of the web interface and you should see indicators referencing which of the three RT-Cloud components have connected (“browser” for data_analyser, “dataConn” for data_streamer, “subjConn” for analysis_listener). All three of these components must be connected before running RT-Cloud.
For reference in interpreting the above command, the “-it” stands for interactive terminal and prevents your command line from becoming unresponsive, the “–rm” will remove the docker container after it finishes running, the “-p 8888:8888” opens/connects the machine’s port 8888 to the Docker container’s port 8888 which allows the RTCloud web browser to work, the “-v” stands for volume and will mount the provided folder to the provided Docker container’s location, the “scripts/data_analyser.sh” executes the shell script located in the scripts folder of the Docker container “brainiak/rtcloud:latest”, the “-p template” informs the shell script the name of the project to run, the “-ip $IP” allows the web certificate to be secured to the current IP address, “–dataRemote” means that the data_streamer component is running on a different machine, and “–subjectRemote” means that the analysis_listener is running on a different machine.
Local
Your project folder (“/template”) should be located inside of your local rtcloud projects folder (“/rt-cloud/projects/template”).
conda activate rtcloud
cd rt-cloud/
bash scripts/data_analyser.sh -p template --dataRemote --subjectRemote
You should eventually see an output in your terminal that says “Listening on: https://localhost:8888” (or http://localhost:8888 if not using SSL encryption). Copy this address and paste it into your web browser. You may need to replace “localhost” with the IP address of the data_analyser (e.g., the public ip address of the cloud machine). Login using the username/password you created in step 2, or using username:test password:test if running in –test mode.
After you login, look to the top-right of the web interface and you should see indicators referencing which of the three RT-Cloud components have connected (“browser” for data_analyser, “dataConn” for data_streamer, “subjConn” for analysis_listener). All three of these components must be connected before running RT-Cloud.
4b. Run data_streamer
The data_streamer component will supply DICOMs to data_analyser. Therefore, you need to provide a path to the folder which contains the DICOMs (<full_path_to_dicom_folder>).
If this step is successful, after a few seconds you should see that “dataConn” is now listed as “connected” in the RTCloud web browser at the top right.
Replace “username” below with the username you specified in step 2a. You will be asked to provide your password. Replace “-u username” with “–test” if using test mode (no SSL encryption).
Docker
Replace <web_browser_ip_address> below with the WEB_IP of the data_analyser component. This is whatever preceded the “:8888” in the URL you used to connect to the web interface in your browser in the previous step 4a (e.g., WEB_IP=172.17.0.1).
DICOM_DIR=<full_path_to_dicom_folder>
WEB_IP=<web_browser_ip_address>

docker run -it --rm -p 8888:8888 -v ~/certs:/rt-cloud/certs -v $DICOM_DIR:/rt-cloud/projects/template/dicomDir brainiak/rtcloud:latest scripts/data_streamer.sh -s $WEB_IP:8888 -d /rt-cloud,/tmp -u username
For reference, “-d /rt-cloud,/tmp” gives access to these folders contained in the Docker container to read/write files.
Local
Place your DICOMs inside a folder named “dicomDir” inside your corresponding projects folder (e.g., /rt-cloud/projects/template/dicomDir).
This is whatever preceded the “:8888” in the URL you used to connect to the web interface in your browser in the previous step 4a (e.g., WEB_IP=localhost).
WEB_IP=<web_browser_ip_address>

conda activate rtcloud
cd rt-cloud/
bash scripts/data_streamer.sh -s $WEB_IP:8888 -d $(pwd) -u username
4c. Run analysis_listener
The analysis_listener component listens for the results output from data_analyser. These results can be used to inform real-time stimulus presentation for the subject in the scanner.
If this step is successful, after a few seconds you should see that “subjConn” is now listed as “connected” in the RTCloud web browser at the top right.
Replace “username” below with the username you specified in step 2a. You will be asked to provide your password. Replace “-u username” with “–test” if using test mode (no SSL encryption).
Docker
OUT_DIR=<full_path_where_you_want_results_to_go>
WEB_IP=<web_browser_ip_address>

docker run -it --rm --name listener -v ~/certs:/rt-cloud/certs -v $OUT_DIR:/rt-cloud/outDir brainiak/rtcloud:latest scripts/analysis_listener.sh -s $WEB_IP:8888 -u username
Local
Results will be saved to a folder named “outDir” in the root of your /rt-cloud folder. If this folder doesn’t already exist, the folder will be created.
WEB_IP=<web_browser_ip_address>

conda activate rtcloud
cd rt-cloud/
bash scripts/analysis_listener.sh -s $WEB_IP:8888 -u username
5. Setting up adaptive stimulus presentation with analysis_listener
Note: you can skip this step and the template project will still run as intended – the only difference here is whether or not you have a presentation software hooked up that makes use of these results.
The most straightforward way to enable real-time adaptive stimulus presentation is to read in files output by data_analyser that are sent over and stored by analysis_listener. This method is compatible with any stimulus presentation software (e.g., PsychoPy, MATLAB). You can simply add a function that waits for a file with a certain name to be created in the specified analysis_listener output directory, read in that file when it becomes available, and change the stimulus presentation depending on the value contained in the file. Our template project saves a json file every TR, which can be read by PsychoPy in realtime as shown in step 5a below.
Note for jsPsych users: you will want to look into integrating jsPsych directly with the RT-Cloud web interface.
5a. PsychoPy example for template project
Assuming PsychoPy is installed (https://www.psychopy.org/download.html) you can run the PsychoPy script contained in “rtcloud-projects/template/psychopy_example/rtcloud_psychopy.py” to see an example for how the analysis_listener outputs can inform experiment presentation in real-time. You will need to make one edit to rtcloud_psychopy.py to define the variable “output_directory” as the full path to your RT-Cloud output directory specified in step 4c above. Run the PsychoPy script before clicking Run in the RT-Cloud web interface.
6. Run the template experiment
Confirm that all RTCloud components are properly connected by looking at the top right of the RTCloud web interface in your browser and ensuring all components are listed as “connected”.
You can now click the “Run” button to simulate the real-time scanning, analysis, and presentation for the template project. Note that real-time results will be displayed in the “Data Plots” tab of the web browser. If you followed step 5a regarding PsychoPy integration, your PsychoPy window will display the realtime analyzed output of each processed brain image.
7. Using RTCloud with your own project
When conducting your own experiment using RTCloud, you will need to provide your own projects folder that contains code to analyse DICOMs in real-time. We recommend copying the template project folder and editing its contents. The template.py file is extensively commented such that you can read through it for specific instructions on how to edit it to suit your own experimental needs.
Copy the template folder located in rtcloud-projects/template and rename the copied folder to the name of your project
Rename template.py to [your project’s name].py and conf/template.toml to conf/[your project’s name].toml
Edit [your project’s name].py and conf/[your project’s name].toml to your desired realtime analysis procedure.
You can directly run the [your project’s name].py file in the terminal (without web browser or connecting different RTCloud components) with the following command (answer yes when asked about continuing using localfiles). Directly running the script this way can be useful for rapid testing and iteration without needing to setup the other RTCloud components.
Docker
PROJ_NAME=<your project's name>
PROJ_DIR=<full_path_to_project_folder>
DICOM_DIR=<full_path_to_dicom_folder>

docker run -it --rm -v $PROJ_DIR:/rt-cloud/projects/$PROJ_NAME -v $DICOM_DIR:/rt-cloud/projects/$PROJ_NAME/dicomDir brainiak/rtcloud:latest python projects/$PROJ_NAME/$PROJ_NAME.py
Local
Your DICOM directory should be located in /rt-cloud/projects/$PROJ_NAME/dicomDir.
PROJ_NAME=<your project's name>

conda activate rtcloud
cd /rt-cloud
python projects/$PROJ_NAME/$PROJ_NAME.py
“Replaying” an OpenNeuro dataset
The template project (https://github.com/brainiak/rtcloud-projects) mentioned in the installation guide above has code demonstrating how to initialize a BIDS Stream for any OpenNeuro dataset by feeding in the dataset’s accession number. Simply modify the very last line of conf/template.toml to specify the accession number of your OpenNeuro dataset:
dsAccessionNumber = <your_OpenNeuro_dataset_accession_number>
You can also look at the openNeuroClient project for a more specialized example for using an OpenNeuro dataset with RT-Cloud.
Other Links
Troubleshooting / Common errors
Python module not found - make sure you have installed and activate the conda environment: ‘conda activate rtcloud’.
Web page gives a blank blue screen - the web javascript bundle wasn’t built, ‘cd web; npm install; npm run build’.
ScannerDataService or subjectService can’t connect to the projectInterface.
Try specifying the ‘–test’ option to all components (projectInterface, scannerDataService, subjectService). This will disable ssl and allow login with a test user, username: test, password: test. The web page will now be at http://localhost:8888 (not https://)
Make sure the projectInterface computer’s firewall has port 8888 open. Try using an ssh tunnel if in doubt, ‘ssh -N -L 8888:localhost:8888 [remote-computer]’
Try running the scannerDataService on the same computer as the projectInterface to test the connection.
Try using a different port, specify the ‘–port [new_port]’ option when starting the projectInterface and when starting the scannerDataService specify the appropriate port using -s [remote-computer]:[port].
Make sure the ssl certificate and private key (rtcloud.crt and rtcloud_private.key) that were created on the projectInterface computer have been copied to the rtcloud/certs directory on the scannerDataService and subjectService computers.
Make sure you have created a username and password using the ‘scripts/add-user.sh’ script.
ProjectInterface cannot find your experiment script. Make sure your script’s name matches the project directory. Or specify the ‘–mainScript [script-name]’ option when starting the projectInterface. In addition the ‘–initScript [init-script]’ and ‘–finalizeScript [finalize-script]’ options can be used to specify the session initialization and finalization scripts.
ProjectInterface or web page indicate ‘RemoteServie: DataService not connected’. This means you started the projectInterface using the –dataRemote option but that a scannerDataService has not established a connection to the projectInterface, so it cannot make remote requests for data. Similarly for ‘SubjectService not connected’ errors.
An error in your script. Try running your script without starting the projectInterface. The clientInterface() method called by your script will create an internal version of the data services if there is no projectInterface started on localhost. If you specify yesToPrompts=True when instantiating the clientInterface (ClientInterface(yesToPrompts=True)) it will automatically use local services if there is no projectInterface running.
A DICOM error is reported such as, “ValueError: The length of the pixel data in the dataset (287580 bytes) doesn’t match the expected length (294912 bytes). The dataset may be corrupted or there may be an issue with the pixel data handler”. This usually indicates that the DICOM file was read by the FileWatcher before the file was completely written. To handle this, adjust the ‘minFileSize’ parameter that is passed to dataInterface.initWatch() or dataInterface.initScannerStream(), see the projects/sample/sample.py for an example. The minFileSize indicates a lower bound file size (in bytes) below which the FileWatcher will continue waiting before reading a file. Set the minFileSize to slightly below the smallest DICOM file size expected.
Running the Automated Test Suite
Follow the installation instructions detailed above
Activate the conda environment
conda activate rtcloud
Additionally, install bids-validator
npm install -g bids-validator
Run the test suite
python -m pytest -s -v tests/